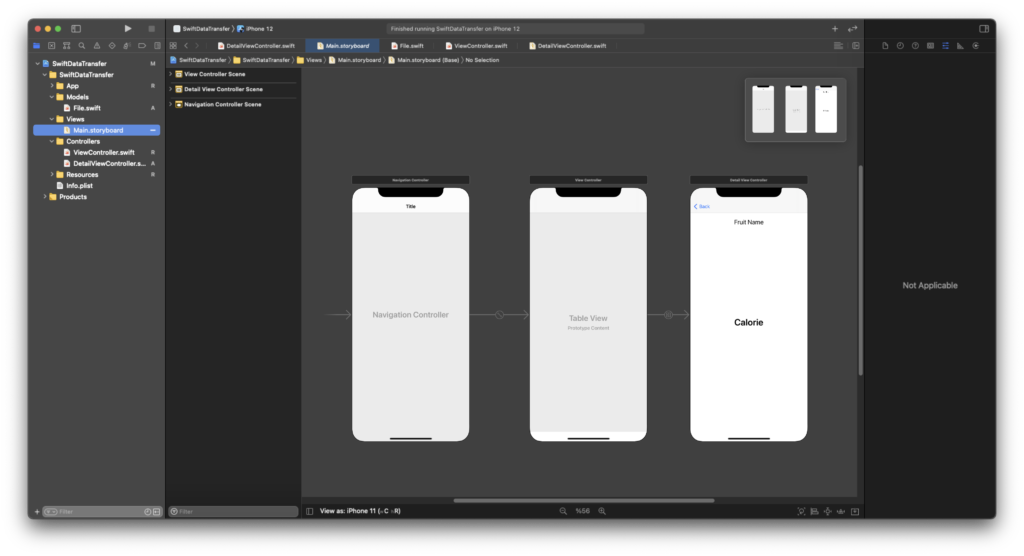
Hello friends, in this article, we will talk about how to send data between two pages with Swift. In the Het application, there is actually a communication between the pages. For example, if you have a list on the home page and we click on an element of this list, we should show the details of it.
Sample
In the example we will do, we will have a fruit model and we will talk about how many calories there are in detail. Let’s show the names of the fruits in our fruit list on our first page. When the list is clicked, let’s go into the detail and write how many calories there are in capital letters. Our design screen looks like this.

Model
We need to create one fruit model. For this, it will be sufficient to create a model that keeps the name of the fruit and how many calories.
struct FruitModel {
    let name: String
    let calorie: Int
}
Controller
Now we keep a set of sample fruits and their calories in our Controller for listing. Then we connect it to our UITableView. We need to keep a variable for the selected fruit. We need to replace this variable with the fruit that the user chooses each time he chooses a fruit. After changing it, we need to run Segue, which allows you to go to our detail page from our list page. We gave this Segue the “showDetail” Identifier. After running Segue, we assign the variable we selected to the fruit variable on the detail page with the prepareSegue function.
//
//  ViewController.swift
//  SwiftDataTransfer
//
//  Created by Omer Sezer on 7.03.2021.
//

import UIKit

class ViewController: UIViewController {

    @IBOutlet weak var tvFruits: UITableView!

    var selectedFruit: FruitModel?

    let models: [FruitModel] = [
        FruitModel(name: "Apple", calorie: 95),
        FruitModel(name: "Avocado", calorie: 320),
        FruitModel(name: "Banana", calorie: 111),
        FruitModel(name: "Cherries", calorie: 4),
        FruitModel(name: "Kiwi", calorie: 112),
        FruitModel(name: "Lime", calorie: 20),
        FruitModel(name: "Mango", calorie: 220),
        FruitModel(name: "Strawberries", calorie: 49),
        FruitModel(name: "Peach", calorie: 59),
        FruitModel(name: "Orange", calorie: 62)
    ]

    override func viewDidLoad() {
        super.viewDidLoad()
        setUI()
    }

    func setUI() {
        // MARK: title
        title = "Fruits"

        // MARK: tvFruits
        tvFruits.delegate = self
        tvFruits.dataSource = self
    }

    func goDetail(fruit: FruitModel) {
        selectedFruit = fruit
        performSegue(withIdentifier: "showDetail", sender: nil)
    }

    override func prepare(for segue: UIStoryboardSegue, sender: Any?) {
        if segue.identifier == "showDetail" {
            let detailVC = segue.destination as! DetailViewController
            detailVC.fruit = selectedFruit
        }
    }
}

extension ViewController: UITableViewDelegate {
    func tableView(_ tableView: UITableView, didSelectRowAt indexPath: IndexPath) {
        tableView.deselectRow(at: indexPath, animated: true)
        goDetail(fruit: models[indexPath.row])
    }

}

extension ViewController: UITableViewDataSource {
    func tableView(_ tableView: UITableView, numberOfRowsInSection section: Int) -> Int {
        return models.count
    }

    func tableView(_ tableView: UITableView, cellForRowAt indexPath: IndexPath) -> UITableViewCell {
        let cell = UITableViewCell()
        cell.textLabel?.text = models[indexPath.row].name
        return cell
    }
}
After assigning the selected fruit to the detail page, it remains only to show it on the screen. We can do this inside viewDidLoad.
//
//  DetailViewController.swift
//  SwiftDataTransfer
//
//  Created by Omer Sezer on 7.03.2021.
//

import UIKit

class DetailViewController: UIViewController {

    @IBOutlet weak var lblFruitName: UILabel!
    @IBOutlet weak var lblFruitCalorie: UILabel!

    var fruit: FruitModel?

    override func viewDidLoad() {
        super.viewDidLoad()

        setUI()
    }

    func setUI() {
        lblFruitName.text = fruit?.name
        lblFruitCalorie.text = "\(fruit?.calorie ?? 0) cal"
    }

}
Our screen output is as follows.

If you have questions, you can reach by e-mail or comment. Good work.
Leave a Reply