Hello friends, in this article we will talk about how to use UIMenu with Swift. For more details on UIMenu, you can access Apple’s documentation here.
On some screens, especially on the detail screens, there may be more than one function and it may be necessary to collect them in one place. For example, there may be buttons on this screen such as share, report, share, delete, edit. From a UX point of view it’s usually good to have these buttons in the NavigationBar. We can add more buttons and then open them as sub-buttons after pressing this button.
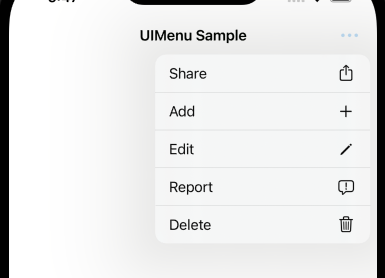
Our example will be like this. We will add more buttons to the NavigationBar and provide options under it.
First of all, I create my actions that will appear in the NavigationBar section. As you can see in the image, I have 5 actions. I set the icons of these actions with SFSymbol. While creating an action, we can add only images or text only, or we can add both visual and text as I did. After adding the texts and images, you can add whatever you want them to do when you click on these actions. I’m just printing something to the console for now.
Then we need to create a menu and add these actions to this menu. While creating the menu, you can enter whatever you want in the title section and then add the actions to the children section.
Finally, we add a BarButton to the NavigationBar. We just put an icon on this BarButton. Then we add the menu we created to this button, for now I left the primaryAction part of this button as nil. You can define any action here. But this time, when you click this button, this action will run first. If you press long, this time other menus will be displayed. You need to set the primaryAction part to nil for a direct menu to appear.
//
// ViewController.swift
// uimenu
//
// Created by Ömer Sezer on 5.05.2022.
//

import UIKit
class ViewController: UIViewController {
    override func viewDidLoad() {
        super.viewDidLoad()
        configure()

    }

}
fileprivate extension ViewController {
    func configure() {
        self.title = "UIMenu Sample"
        setMoreButton()

    }
    func setMoreButton() {
        let actionShare = UIAction(title: "Share", image: .share) { action in
            print("action share clicked")
        }
        let actionAdd = UIAction(title: "Add", image: .add) { action in
            print("action add clicked")

        }
        let actionEdit = UIAction(title: "Edit", image: .edit) { action in
            print("action edit clicked")

        }
        let actionReport = UIAction(title: "Report", image: .report) {action in
            print("action report clicked")

        }
        let actionDelete = UIAction(title: "Delete", image: .delete) { action in
            print("action delete clicked")

        }
        let menu = UIMenu(title: "", children: [actionShare, actionAdd, actionEdit, actionReport, actionDelete])
        navigationItem.rightBarButtonItem = UIBarButtonItem(title: nil, image: .more, primaryAction: nil, menu: menu)

    }

}
The BarButton we created works as in the gif.
You can find the sample project on Github. You can find more articles about Swift here. If you have questions, you can reach us by sending an e-mail or comment.
Leave a Reply