You may be receiving data from internet or you may want to keep tour data in a sequential order. To do this, you need to export your data to list and print it on the screen using a ListView in Xamarin. I will talk about this in my article today.
First we open a project. With this project we are opening, rebuild and wait for packages to settle. Then we need to set a standart for a data sorting. We must vreate a model for this. In this article iwould like to show you a guide application example. We create a model called Gıide. In this model we will store information such as name, surname, number, mail and home address.
public class Rehber
    {
        public string Ad { get; set; }
        public string Soyad { get; set; }
        public string Numara { get; set; }
        public string Mail { get; set; }
        public string Adres { get; set; }


    }
Then we will design the page that will display the guide. First we assign a title. Later in the StackLayout by putting a ListView we will store our data regularly around here. Here, using the Grids, name surnames and numbers will be displayed regularly.
<StackLayout>
            <!-- Başlık kısmı-->
            <StackLayout Padding="20">
                <Label HorizontalTextAlignment="Center"
                       Text="REHBER"
                       FontAttributes="Bold"
                       TextColor="Black"/>
            </StackLayout>
            <!-- Rehberin görüntüleceği kısmı tasarlıyrouz-->
            <StackLayout>
                <ListView x:Name="listRehber" ItemsSource="{Binding .}">
                    <ListView.ItemTemplate>
                        <DataTemplate>
                            <ViewCell>
                                <ViewCell.View>
                                    <Grid>
                                        <Grid.ColumnDefinitions>
                                            <ColumnDefinition Width="*"/>
                                            <ColumnDefinition Width="*"/>
                                        </Grid.ColumnDefinitions>
                                        <Grid Grid.Column="0">
                                            <Grid.ColumnDefinitions>
                                                <ColumnDefinition Width="*"/>
                                                <ColumnDefinition Width="*"/>
                                            </Grid.ColumnDefinitions>
                                            <Label Text="{Binding Ad}"
                                                   TextColor="Black"
                                                   Grid.Column="0"/>
                                            <Label Text="{Binding Soyad}"
                                                   TextColor="Black"
                                                   Grid.Column="1"/>
                                        </Grid>
                                        <StackLayout Grid.Column="1">
                                            <Label Text="{Binding Numara}"
                                                   TextColor="Black"
                                                   />
                                        </StackLayout>
                                    </Grid>
                                </ViewCell.View>
                            </ViewCell>
                        </DataTemplate>
                    </ListView.ItemTemplate>
                </ListView>
            </StackLayout>
        </StackLayout>
When we come to the .cs part of this page, first we need to add a few numbers to the pavilion so let’s show it to the list. I am creating a function for this. Here I add 3 peoples to the list of contacts so that the list does not appear empty.
public void ListeDoldur(List<Rehber> list)
        {
            list.Add(new Rehber
            {
                Ad = "Ömer",
                Soyad = "Sezer",
                Numara = "21423423525",
                Mail = "oomersezer@gmail.com",
                Adres = "asdadasdasd"
            });
            list.Add(new Rehber
            {
                Ad = "Mehmet",
                Soyad = "Şükrü",
                Numara = "2141241241",

            });
            list.Add(new Rehber
            {
                Ad = "Ahmet",
                Soyad = "Veli",
                Numara = "34235235"
            });
        }
Then I put the list I added directly into the ListView that I created in the design section.
List<Rehber> liste = new List<Rehber>();
	public AnaSayfa ()
	{
	    InitializeComponent ();
            ListeDoldur(liste);
            listRehber.BindingContext = liste;
	}
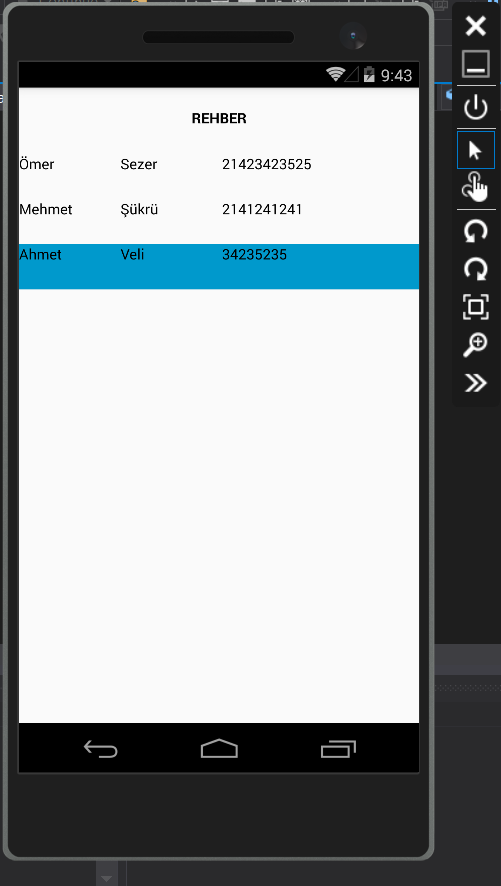
The screen output is as follows.

You can reach the project here. If you have any questions about ListView, you can reach us by comment or mail.
Comments (3)
Mustafa Kartalsays:
Thursday March 28th, 2019 at 11:45 AMMerhaba seçili ögenin içeriğini nasıl değiştirebiliriz örnek seçili mehmet olan kayıdı veli diye değiştirmek istiyorum
omersezersays:
Thursday March 28th, 2019 at 12:15 PMMerhabalar githuba örnek bir proje atarsanız beraber üzerinde güncelleyip, makalesini yazarız.
Bahadır Ercansays:
Monday February 24th, 2020 at 01:17 PMMerhaba ListView e farklı bir sayfadan örneğinizi ele alacak olursak KisiEkle diye farklı bir sayfadan yeni öğeler nasıl ekleye biliriz.